Discover the awe-inspiring beauty of Half Dome, the crown jewel of Yosemite National Park. This blog takes you on a journey through breathtaking landscapes and reveals the fascinating geology and rich history behind this iconic landmark. Whether you’re an avid photographer or simply a lover of nature’s wonders, join us as we uncover the best vantage points to capture the beauty of Half Dome, turning moments into timeless memories.
Table of Contents
Half Dome – The Crown Jewel of Yosemite National Park
Half Dome, an iconic granite formation located in Yosemite National Park, is a photographer’s paradise. With its unique geological features and breathtaking vistas, capturing the beauty of Half Dome through landscape photography is a rewarding challenge. This blog will delve into the fascinating geology and history of Half Dome and provide valuable tips on how to photograph it from the best vantage points.
The Geology of Half Dome
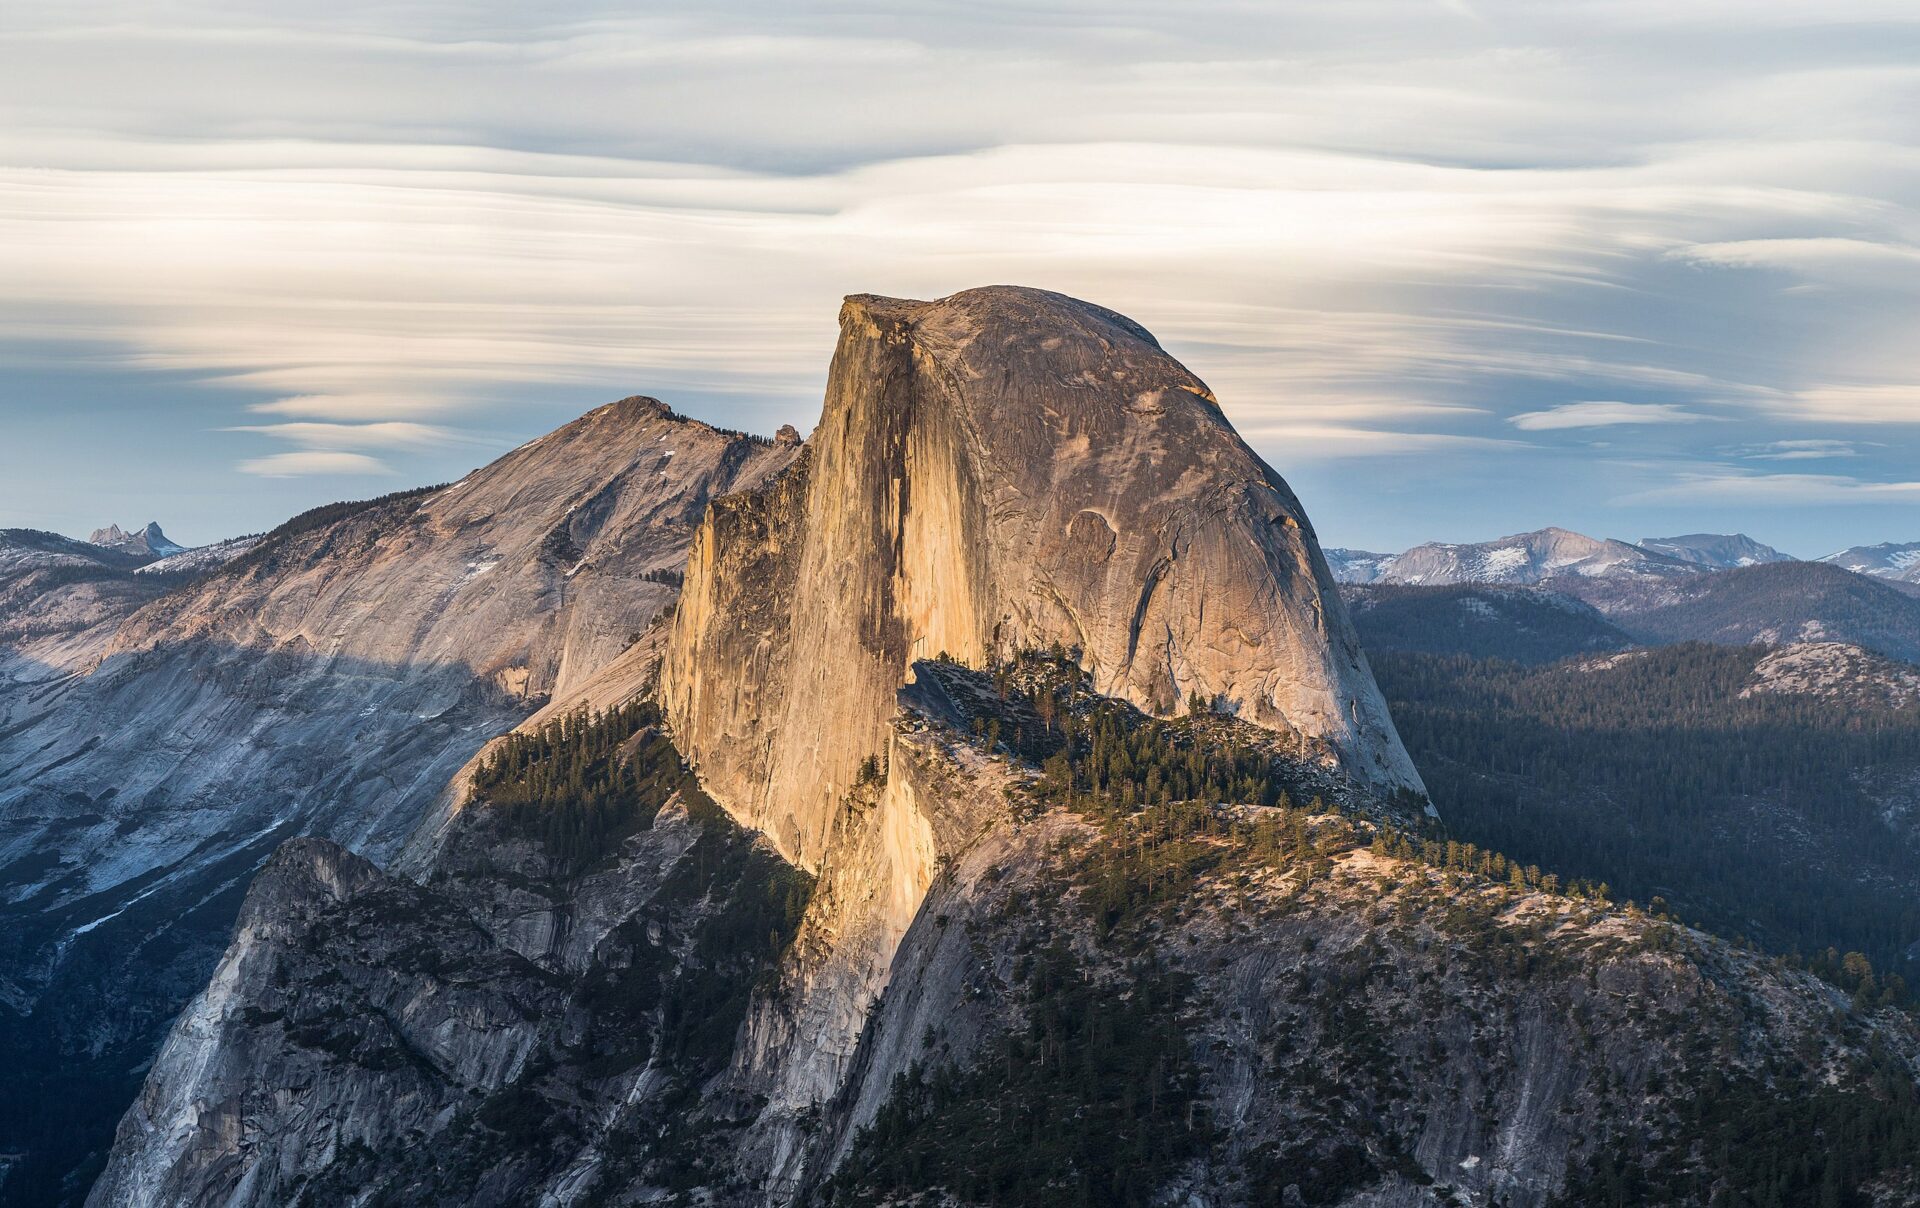
Half Dome is a granite dome that stands at an impressive 8,842 feet above sea level. Its distinct shape, resembling a massive hemisphere, is the result of millions of years of geological processes. The formation was created through exfoliation, a process where layers of rock gradually peeled away, revealing the smooth and curved face that we see today.
Photographing Half Dome with its unique geology as the subject allows you to capture the depth and texture of the granite. Experiment with different lighting conditions, such as sunrise or sunset, to highlight the intricate patterns on its surface. Utilize long exposure techniques to capture the movement of the clouds over this majestic geological marvel.
Best Vantage Points for Photographers
To capture the true essence of Half Dome, it is crucial to explore different vantage points within Yosemite National Park. Here are a few suggestions for prime photography locations:
- Glacier Point: Located at an elevation of 7,214 feet, Glacier Point offers a panoramic view of Half Dome and its surrounding landscape. Capture the grandeur of this iconic formation against the backdrop of Yosemite Valley.
- Cook’s Meadow: This picturesque meadow offers a closer view of Half Dome, making it an excellent location for intimate landscape photography. Experiment with wide-angle lenses to capture the vastness of the scene.
- Tunnel View: As you drive through the Wawona Tunnel, be prepared to witness one of the most awe-inspiring views in Yosemite. The Tunnel View provides a unique frame for Half Dome, with the Yosemite Valley stretching out before it.
Remember to explore the surrounding trails and hike to higher elevations for additional perspectives. It’s essential to plan your visit to coincide with the best lighting conditions, such as the golden hours around sunrise and sunset, to enhance the drama and beauty of your photographs.
When photographing Half Dome, it’s crucial to bring along the right equipment. A sturdy tripod will help stabilize your camera during long exposures, allowing for sharp and detailed images. Wide-angle lenses are ideal for capturing the vast scale of Half Dome, while telephoto lenses can be used to emphasize the smaller details. Lastly, don’t forget to pack extra batteries and memory cards to ensure you don’t miss any magical moments.
In conclusion, Half Dome is a true gem within Yosemite National Park, attracting photographers from around the world. Its unique geology and mesmerizing landscapes offer endless opportunities for capturing stunning images. Venture to the best vantage points, experiment with different techniques, and let the beauty of Half Dome inspire your landscape photography.
Did you know that the iconic Half Dome in Yosemite National Park was formed by a combination of glacial and erosional processes over millions of years? This granite monolith stands at a height of 8,842 feet and offers breathtaking views of the surrounding landscape.
The Best Equipment for Photographing Half Dome
Camera Choice
When it comes to photographing the majestic Half Dome in Yosemite National Park, having the right equipment can make all the difference in capturing its beauty. The first decision to make is what camera to use.
For landscape photography, a full-frame DSLR camera is often preferred for its superior image quality and dynamic range. Cameras like the Nikon D850 or the Canon EOS 5D Mark IV are popular choices among professional landscape photographers.
However, if you prefer a more lightweight and portable option, mirrorless cameras such as the Sony Alpha a7R III or the Fujifilm X-T4 are excellent alternatives. These cameras offer exceptional image quality in a smaller and lighter package.
Choosing the Right Lenses
Once you have your camera, selecting the right lens or lenses becomes crucial in capturing the grandeur of Half Dome.
A wide-angle lens is essential for capturing the vastness of the landscape surrounding Half Dome. Opt for a lens with a focal length between 14mm and 24mm to capture the expansive views. The Canon EF 16-35mm f/2.8L III USM or the Nikon AF-S NIKKOR 14-24mm f/2.8G ED are great options.
For capturing the intricacies of Half Dome itself, a telephoto lens is ideal. A lens in the range of 70mm to 200mm will allow you to zoom in and capture the details of the rock formations. The Sony FE 70-200mm f/2.8 GM OSS or the Canon EF 70-200mm f/2.8L IS III USM are both exceptional choices.
If you wish to photograph the climbers on Half Dome or capture tight close-up shots, a super telephoto lens can be advantageous. A lens with a focal length of 300mm to 600mm, such as the Nikon AF-S NIKKOR 500mm f/5.6E PF ED VR or the Canon EF 600mm f/4L IS III USM, will allow you to capture stunning details from a distance.
Additional Equipment
Aside from a camera and lenses, several other pieces of equipment can enhance your photography experience at Half Dome. Here are a few options:
- A sturdy tripod: A tripod is crucial for capturing sharp and steady images, especially during low light situations. Look for one that is lightweight yet durable, such as the Manfrotto MT055CXPRO3 Carbon Fiber Tripod.
- A polarizing filter: This filter helps reduce glare and enhances color saturation, resulting in more vibrant and contrasted images. The B+W Circular Polarizer MRC filter or the Hoya HD Circular Polarizer are excellent options.
- A remote shutter release: This handy tool allows you to trigger the shutter without touching the camera, reducing the risk of camera shake. The Canon RC-6 Wireless Remote Control or the Nikon ML-L3 Wireless Remote Control are both reliable choices.
- An extra set of batteries and memory cards: You do not want to run out of power or storage space while shooting. Always carry spare batteries, such as the Nikon EN-EL15b or the Canon LP-E6N, and high-capacity memory cards, like the SanDisk Extreme PRO SDXC UHS-I Card.
Investing in quality equipment will ensure that you can capture the true essence of Half Dome in your photographs. Whether you choose a full-frame DSLR, a mirrorless camera, wide-angle or telephoto lenses, or different accessories, be sure to practice and experiment with your gear to achieve the best results.
Discover Half Dome – The Jewel of Yosemite
Half Dome, located in the breathtaking Yosemite National Park in the USA, is a sight to behold. Its iconic granite formation, towering more than 8,800 feet above sea level, has captivated nature lovers and photographers alike for centuries. This blog will take you on a journey through the unique geology, historical significance, and provide insights on how to capture the best photos of this majestic wonder.
Timing is Everything: Best Time of Year to Capture Half Dome
While Half Dome is awe-inspiring year-round, choosing the right time to photograph it can greatly enhance the visual impact of your shots. The most popular time to visit Yosemite National Park is during the summer months, but for landscape photographers, spring and fall offer unique opportunities.
In the spring, the melting snow in the Sierra Nevada Mountains creates a dramatic flow of water in the surrounding streams and waterfalls, providing a stunning contrast against Half Dome’s granite facade. The lush greenery and wildflowers in bloom add vibrant colors to your photographs, creating a picturesque composition.
In the fall, the changing foliage creates a stunning backdrop for Half Dome. The golden hues of the surrounding trees, combined with the warm, soft light of autumn, add a sense of tranquility and warmth to your images. Moreover, the smaller crowds during these seasons give photographers more freedom to explore vantage points without distractions.
Best Vantage Points for Photographing Half Dome
To capture the best photos of Half Dome, here are some prime vantage points that offer unique perspectives:
- The Tunnel View: Located on State Route 41, this iconic viewpoint offers a panoramic vista of Yosemite Valley with Half Dome as the centerpiece. From here, you can capture the entire grandeur of Half Dome along with other iconic landmarks like El Capitan and Bridalveil Fall.
- Olmsted Point: Situated on Tioga Road, Olmsted Point provides a more distant view of Half Dome. This viewpoint offers a unique angle, showcasing the vastness of the surrounding landscapes and the sheer size of Half Dome against the backdrop of the Sierra Nevada Mountains.
- Sentinel Dome: For a more intimate and dramatic perspective, hike up to Sentinel Dome. From the top, you’ll have an uninterrupted view of Half Dome, with Yosemite Valley sprawling out beneath you. This vantage point is especially mesmerizing during sunrise or sunset, as the changing light adds depth and texture to your photographs.
Each vantage point mentioned above offers its own distinct charm, so consider exploring multiple locations to capture Half Dome’s beauty from different angles.
Whether you’re an experienced landscape photographer or just starting out, Half Dome in Yosemite National Park is a must-visit destination. Its unique geology, rich history, and jaw-dropping scenery make it a truly remarkable subject. Remember to plan your visit during the best time of year for photography and explore different vantage points to capture the full essence of this jewel in the heart of Yosemite.
Capture the majestic Half Dome in all its glory with a wide-angle lens. Its immense size and breathtaking landscape can be best captured with a lens that can encompass the entire scene. Experiment with different focal lengths to find the perfect composition and showcase the grandeur of Yosemite National Park.
Frequently Asked Questions
Q: What is Half Dome?
Half Dome is a prominent granite rock formation located in Yosemite National Park, USA. It is one of the park’s most iconic features and a popular hiking destination.
Q: How did Half Dome form?
Half Dome was formed through millions of years of geological processes. It is a result of uplift and erosion, with glaciers playing a significant role in shaping its unique dome-like appearance.
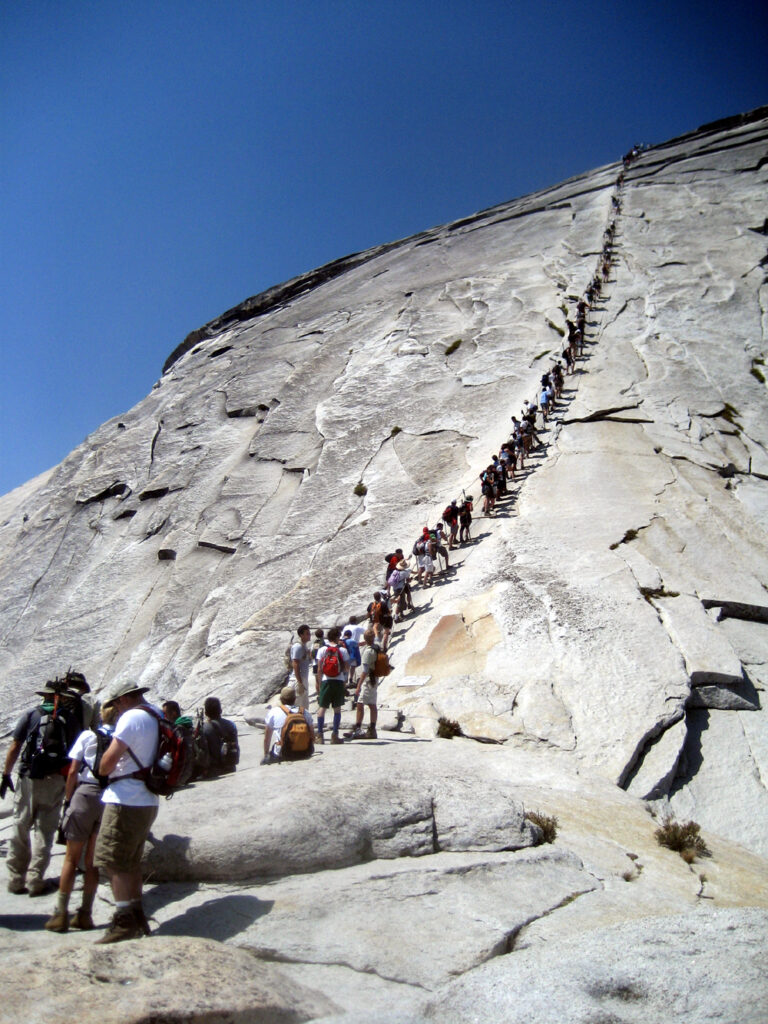
Q: Can I hike to the top of Half Dome?
Yes, you can! However, hiking to the top of Half Dome requires a permit due to its challenging nature. The permit system ensures safety and preservation of the trail. Make sure to check the park’s website for more information on obtaining a permit.
Q: What are the best vantage points for photographing Half Dome?
There are several fantastic vantage points for capturing Half Dome’s beauty. Glacier Point offers a breathtaking panoramic view, while Washburn Point provides a unique angle. Additionally, hiking up the Mist Trail or visiting Mirror Lake offers closer viewpoints.
Q: When is the best time to photograph Half Dome?
The best time to photograph Half Dome is during sunrise or sunset when the warm light enhances the colors of the rock. However, the iconic silhouette can be captured throughout the day, depending on the desired effect and weather conditions.
Q: Can I capture Half Dome’s reflection in a water body?
Yes, you can photograph Half Dome’s reflection in Mirror Lake or any other water body when conditions are right. Mirror Lake offers a stunning mirror-like surface during the spring and early summer when the water levels are high.
Wrap Up
In conclusion, Half Dome is undeniably the crown jewel of Yosemite National Park. Its majestic presence, unique geology, and rich history make it a must-see for any nature enthusiast or landscape photographer. Whether you hike to its summit, admire it from Glacier Point, or capture its beauty in photographs, Half Dome will leave you in awe.
Don’t miss the opportunity to witness this natural wonder firsthand. Plan your trip to Yosemite and embark on an adventure that will forever be etched in your memories. Share your experiences and thoughts in the comments below. Have you visited Half Dome, or are you planning to? We’d love to hear from you! Engage with us and let’s continue our journey together in discovering the wonders of our world.