Welcome to the enchanting world of light painting photography! Prepare to be captivated as we dive into the mesmerizing art of creating illuminated masterpieces through long exposures. Join us on a journey exploring the techniques, tools, and camera settings needed to produce awe-inspiring images in various locations. From bustling city streets to serene natural landscapes, discover the magic that unfolds when the shutter stays open, revealing a hidden world of colors and shapes. Unleash your creativity and let’s embark on this illuminated adventure together!
Table of Contents
- The Magic of Light Painting Photography
- Choosing the Right Camera
- The Magic of Light Painting Photography
- Frequently Asked Questions
- 1. What is light painting photography?
- 2. How can I achieve long exposures in my photography?
- 3. What tools and equipment do I need for light painting photography?
- 4. What are some creative light painting techniques?
- 5. How can I master light painting photography?
- 6. Are there any safety considerations with light painting photography?
- 7. Can I create light painting images with a smartphone?
- 8. Where can I find inspiration for light painting photography?
- Wrap Up
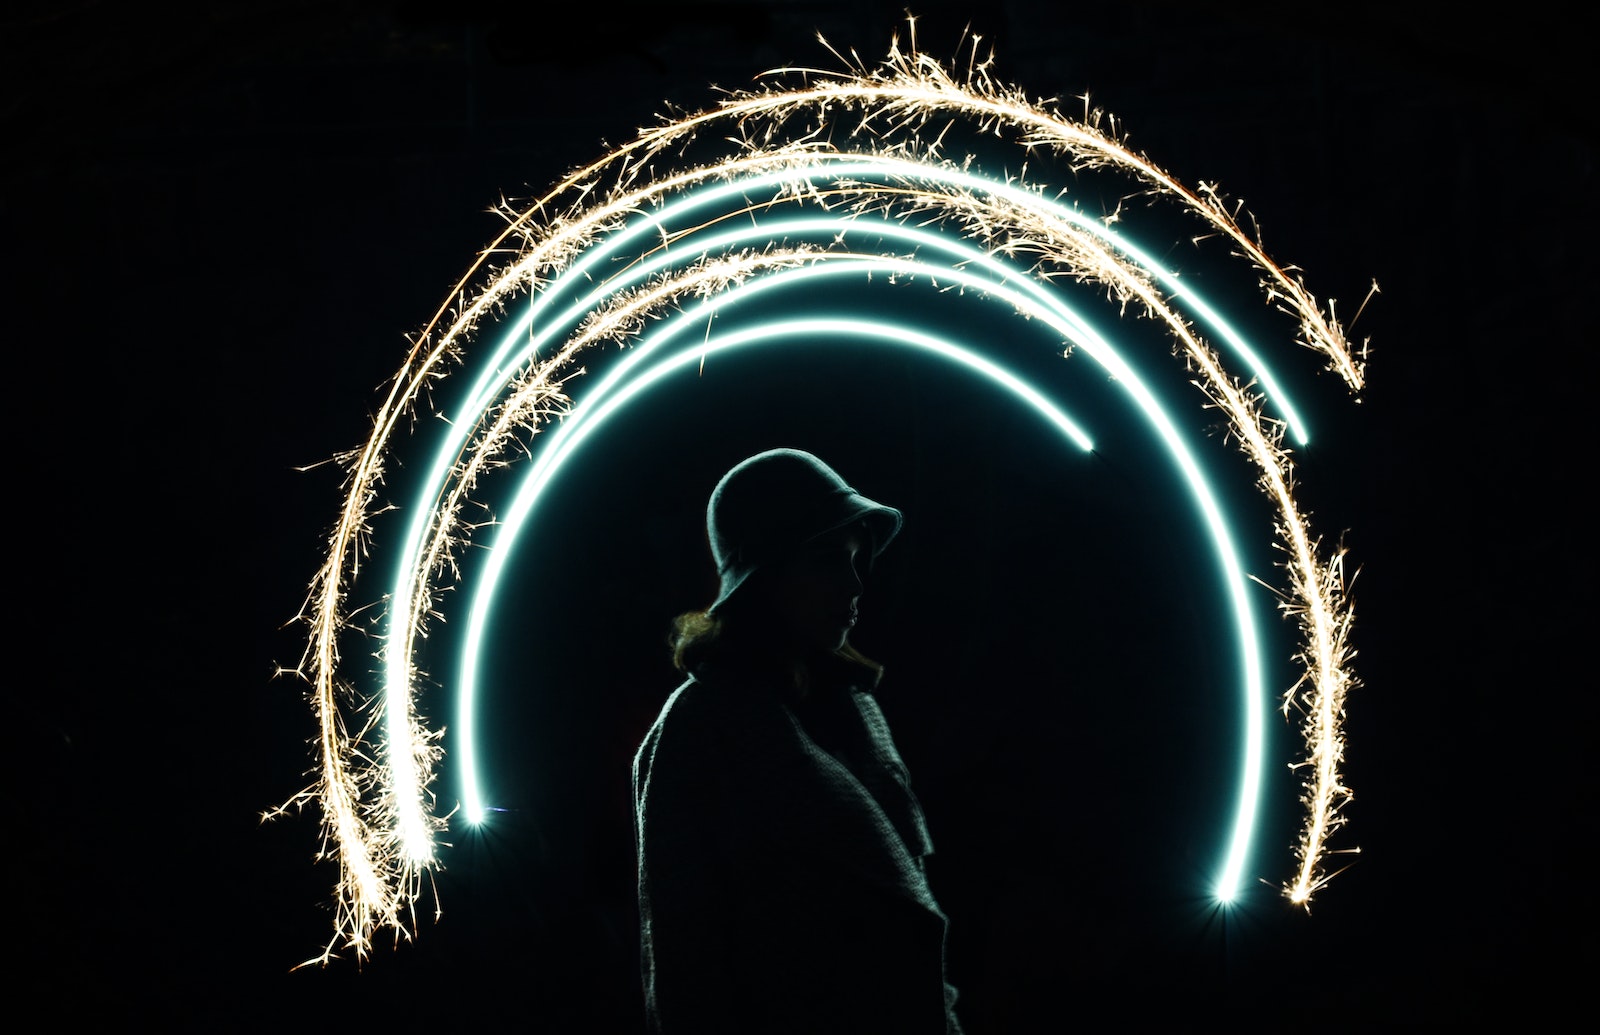
The Magic of Light Painting Photography
Light painting photography is a fascinating technique that allows photographers to create stunning and magical images using long exposures and various light sources. By using a combination of creativity, patience, and the right techniques, photographers can transform ordinary scenes into extraordinary works of art. In this article, we will explore the enchanting world of light painting photography and discover how to use long exposures to capture incredible light-painted images.
Unleashing Your Creativity
One of the most exciting aspects of light painting photography is the endless possibilities it offers for artistic expression. With a camera in hand, you have the power to transform the environment and play with light in ways that are not visible to the naked eye. Virtually any light source can be used, from flashlights and LED strips to sparklers and even glow sticks.
To start your light painting journey, begin by finding a suitable subject. Look for interesting features that can be illuminated in a unique and captivating way. This could be a striking architectural structure, a serene landscape, or an everyday object that you want to highlight in a new perspective. The key is to choose a subject that offers the opportunity to create visually compelling images.
Once you have found your subject, it’s time to plan your shot. Consider the composition and framing, taking into account how the light will interact with the scene. Experiment with different angles and perspectives to create depth and visual interest in your photographs.
Mastery of Long Exposures
To capture the mesmerizing trails of light in your images, mastering the art of long exposures is essential. Long exposures involve keeping the camera shutter open for an extended period, allowing more light to reach the sensor. This technique enables you to record the movement of light over time, resulting in captivating streaks and swirls of color.
Start by placing your camera on a steady tripod to avoid any movement during the long exposure. Set your camera to manual mode and choose a small aperture (high f-stop number) to ensure a greater depth of field. Adjust the ISO to the lowest value to reduce noise in your images. Experiment with different shutter speeds to achieve the desired effect, ranging from a few seconds to several minutes.
As you prepare to take the shot, remember to use a remote shutter release or the camera’s timer function to avoid any camera shake caused by pressing the shutter button. Patience is key when working with long exposures, as you may need to wait for several seconds or minutes to capture the perfect light-painted image.
During the long exposure, employ your chosen light source to illuminate the subject. Move the light source across the frame, trace patterns in the air, or create intricate designs to add a unique touch to your photographs. Experimentation and practice will allow you to refine your techniques and create increasingly mesmerizing light paintings.
Remember, there are no hard and fast rules in light painting photography. Embrace your creativity, let your imagination soar, and allow the magic of light to guide your artistic journey. With the right techniques and a sense of adventure, you can unlock the full potential of light painting photography and create images that captivate viewers and bring your vision to life.
Did you know that Light Painting photography, also known as "painting with light," has been around since the mid-19th century? It is a technique that allows photographers to create stunning and unique images by using long exposures and light sources.
Choosing the Right Camera
Taking captivating light painting photographs requires a camera capable of long exposure shots and manual control over settings. Ideally, a camera with a bulb mode, which allows for extended shutter speeds beyond the standard 30 seconds, is recommended. This feature enables photographers to capture intricate and detailed light trails.
While there are countless camera options available, it ultimately depends on your budget and preferences. For those starting out in light painting photography, an entry-level DSLR or mirrorless camera can be a great choice. These cameras often offer a good balance between performance and affordability.
For enthusiasts who desire more advanced features, consider investing in a full-frame DSLR camera. With larger sensors and greater dynamic range, these cameras excel in low light conditions and produce stunning image quality. Additionally, they offer flexibility when paired with interchangeable lenses, allowing photographers to experiment with various focal lengths and perspectives.
Essential Equipment for Light Painting Photography
In addition to the camera itself, there are a few essential pieces of equipment that can hugely enhance your light painting photography experience.
- Sturdy Tripod: A stable tripod is a must-have for long exposure shots. It keeps your camera steady during the extended exposure times required for light painting, ensuring crisp, sharp images.
- Remote Shutter Release: A remote shutter release or intervalometer allows you to trigger the camera without touching it, minimizing the chances of introducing unwanted camera shake. This is particularly useful when shooting in bulb mode, where precise timing is crucial.
- Wide-Angle Lens: Opt for a wide-angle lens to capture as much of the scene as possible. A lens with a focal length between 14mm and 35mm is ideal for capturing expansive landscapes or urban environments illuminated by light painting.
- Light Sources: Experimenting with different light sources, such as handheld flashlights, LED panels, or even fireworks, adds a creative touch to your light painting images. These tools allow you to paint vibrant streaks of light or create mesmerizing shapes and patterns.
- Light Painting Tools: To create more precise and intricate light patterns and shapes, consider using light painting tools like fiber optic brushes, colored gels, or homemade light stencils. These tools provide greater control over the light, enabling you to unleash your creativity.
Remember, the best camera and equipment for light painting photography are the ones that fit your budget and personal style. There is no right or wrong choice – what matters most is your dedication to learning and experimenting with different techniques to create breathtaking illuminated art.
The Magic of Light Painting Photography
Light painting is a unique photography technique that allows photographers to create stunning images by capturing the movement of light. By using long exposures, photographers have the power to transform ordinary scenes into illuminated works of art. Whether you are a professional photographer or an amateur enthusiast, light painting photography is an exciting and creative way to capture the world around you.
Best Time of Year for Light Painting Photography
While light painting can be done at any time of the year, certain seasons offer unique opportunities for capturing magical moments. The best time of year to engage in light painting photography largely depends on the effects you wish to create.
In the spring, for instance, the longer daylight hours provide more flexibility and allow for experimenting with different techniques. Summer, on the other hand, offers warm nights and longer exposure times, perfect for capturing vibrant light trails and fireworks displays. Autumn presents an ideal setting with its vibrant colors, making it a great time for light painting in nature.
Winter brings a different kind of magic, with snow and ice reflecting the light in captivating ways. Cityscapes during winter nights provide the perfect opportunity to capture the dazzling display of holiday lights against the darkness. Each season offers its own unique opportunities for light painting photography, allowing you to explore and experiment with different settings and effects.
Choosing the Best Vantage Points and Positions
To truly capture the magic of light painting, choosing the right vantage point and position is crucial. Here are a few options to consider:
- Elevated Positions: Find a high vantage point to capture a wide view of the scene. This will allow you to capture the movement of light in a grand and sweeping manner. For example, a rooftop overlooking a city skyline or a hilltop with a view of a landscape can offer breathtaking results.
- Close-Up and Personal: Sometimes getting up close and personal can reveal hidden details and create a more intimate connection with the subject. Experiment with capturing light painting photography in confined spaces like abandoned buildings or even your own home. The play between light and shadow can result in striking images.
- Natural Landmarks: Seek out natural landmarks such as waterfalls, caves, or cliffs that offer unique opportunities for light painting. The contrast between the natural environment and the illuminated strokes of light adds an element of wonder and awe to your photographs.
Remember, the best vantage points and positions for light painting photography will vary depending on the scene and your creative vision. Don’t be afraid to try different angles and perspectives to find the perfect composition.
To achieve stunning light painting photos, use a tripod to keep your camera steady during long exposures. Set your camera to manual mode and adjust the aperture to a small f-stop (e.g., f/8 or smaller) for a deeper depth of field. Experiment with different light sources and techniques to create mesmerizing visual effects.
Frequently Asked Questions
1. What is light painting photography?
Light painting photography is a technique where long exposures are used to capture the movement of light sources, creating mesmerizing and artistic images. This technique allows photographers to paint with light and capture stunning visual effects.
2. How can I achieve long exposures in my photography?
To achieve long exposures, you need to use a camera with manual settings and a tripod to keep the camera steady. Set your camera to a low ISO, select a small aperture, and decrease the shutter speed to several seconds or even minutes, depending on the desired effect.
3. What tools and equipment do I need for light painting photography?
For light painting photography, you’ll need a camera with manual settings, a sturdy tripod, a remote shutter release or self-timer function, various light sources like flashlights, LED lights, or glow sticks, and a dark location to work in.
4. What are some creative light painting techniques?
There are several creative light painting techniques you can explore, including creating light trails with moving subjects, using multiple light sources to paint complex patterns, light orbs or spirals, and incorporating props or models into your light painting compositions.
5. How can I master light painting photography?
Mastering light painting photography requires practice and experimentation. Start by experimenting with different light sources, movements, and compositions. Understand the exposure triangle (ISO, aperture, and shutter speed) and how they affect the final image. Continuously refine your techniques and develop your creativity.
6. Are there any safety considerations with light painting photography?
Yes, safety is an important aspect of light painting photography. Always be cautious when working with light sources, especially powerful ones like lasers. Ensure you are in a safe environment, away from any flammable materials, and be considerate of others if you are working in public spaces.
7. Can I create light painting images with a smartphone?
While it’s possible to create light painting images with a smartphone, the results may be limited due to the manual control limitations of most smartphone cameras. For optimal results, it’s recommended to use a camera with manual settings and more control over exposure.
8. Where can I find inspiration for light painting photography?
You can find inspiration for light painting photography through various sources such as online photography communities, social media platforms, photography books, and attending photography exhibitions. Experimenting and pushing your creative boundaries will also help you discover your own unique style.
Wrap Up
Light painting photography is a mesmerizing artform that allows you to unleash your creativity and capture stunning images. By using long exposures, you can transform ordinary scenes into extraordinary works of art. Follow the techniques mentioned in this blog, experiment with different light sources, and push the boundaries of your photography skills.
Remember, practice makes perfect in light painting photography. Stay patient and persistent as you explore this magical technique. Don’t be afraid to break the rules and find your own unique style. And most importantly, have fun with it!
I hope this blog has inspired you to dive into the world of light painting photography. If you have any questions, suggestions, or if you’d like to share your own light painting images, please leave a comment below. Let’s connect and share our passion for this extraordinary artform!